By James Skelton and Shaoni Mukherjee

Introduction
Update: We have also created Part 2 of this tutorial on Textual Inversion, and it is now available online.
Dreambooth offers an exciting new approach to the technology behind Latent Diffusion models, including the widely-used pre-trained model Stable Diffusion.
This new method allows users to input a minimum of three images of a subject along with the corresponding class name (e.g., “dog,” “human,” “building”) to fine-tune and personalize any text-to-image model. This model encodes a unique identifier that refers to the subject. When combined with the remarkable versatility of Stable Diffusion, we can create impressive models that feature robust representations of any object or style we choose.
In this tutorial, we will walk step-by-step through the setup, training, and inference of a Dreambooth Stable Diffusion model within a Jupyter notebook.
Set up the Notebook Environment

Once we have launched the Notebook, make sure to follow the instructions on the page to set up the environment. We will start by running the install cell at the top first to get the necessary packages.
!pip install -qq diffusers==0.4.1 accelerate tensorboard ftfy
!pip install -qq -U transformers
!pip install -qq "ipywidgets>=7,<8"
!pip install -qq bitsandbytes
We will log into Hugging Face to access the model files. Make sure to obtain permission to access the files using your Hugging Face account. Once you have permission, paste the token found here into the code cell below where it says <your_huggingface_token>.
Run the cell to log in.
!wget https://raw.githubusercontent.com/gradient-ai/stable-diffusion/main/login.py
!python login.py --token <your_huggingface_token>
Finally, we will complete the setup by importing the relevant libraries and creating an image_grid function to display our image outputs in a grid based on the number of samples and rows.
#@title Import required libraries
import argparse
import itertools
import math

import os
from contextlib import nullcontext
import random

import numpy as np
import torch
import torch.nn.functional as F
import torch.utils.checkpoint
from torch.utils.data import Dataset

import PIL
from accelerate import Accelerator
from accelerate.logging import get_logger
from accelerate.utils import set_seed
from diffusers import AutoencoderKL, DDPMScheduler, PNDMScheduler, StableDiffusionPipeline, UNet2DConditionModel
from diffusers.hub_utils import init_git_repo, push_to_hub
from diffusers.optimization import get_scheduler
from diffusers.pipelines.stable_diffusion import StableDiffusionSafetyChecker
from PIL import Image
from torchvision import transforms
from tqdm.auto import tqdm
from transformers import CLIPFeatureExtractor, CLIPTextModel, CLIPTokenizer

import bitsandbytes as bnb


# Helper function

def image_grid(imgs, rows, cols):
    assert len(imgs) == rows*cols

    w, h = imgs[0].size
    grid = Image.new('RGB', size=(cols*w, rows*h))
    grid_w, grid_h = grid.size

    for i, img in enumerate(imgs):
        grid.paste(img, box=(i%cols*w, i//cols*h))
    return grid
Now that the setup is complete, we will begin setting up the data and concept variables that we will use for fine-tuning later on.
Setting up our concept
We have two options moving forward: we can either follow the demo exactly as it is or use our own images. If we choose to use our own images, we should create an "inputs" directory and upload our images there. If we prefer to follow the demo, we can run the cell below. This will create the "inputs" directory and set up a list of image URLs to download into that directory.
!mkdir inputs
#@markdown Add here the URLs to the images of the concept you are adding. 3-5 should be fine
urls = [
      "https://huggingface.co/datasets/valhalla/images/resolve/main/2.jpeg",
      "https://huggingface.co/datasets/valhalla/images/resolve/main/3.jpeg",
      "https://huggingface.co/datasets/valhalla/images/resolve/main/5.jpeg",
      "https://huggingface.co/datasets/valhalla/images/resolve/main/6.jpeg",
      ## You can add additional images here
      ]
Now, we need to begin setting up the subject for our DreamBooth training by uploading or downloading images for our concept to the repo inputs.
You can also use the code in the cell above to alter the sample image URLs downloaded for this demo, if the data is stored publicly online.
# @title Setup and check the images you have just added
import requests
import glob
from io import BytesIO

def download_image(url):
  try:
    response = requests.get(url)
  except:
    return None
  return Image.open(BytesIO(response.content)).convert("RGB")

images = list(filter(None,[download_image(url) for url in urls]))
save_path = "./inputs"
if not os.path.exists(save_path):
  os.mkdir(save_path)
[image.save(f"{save_path}/{i}.jpeg") for i, image in enumerate(images)]
image_grid(images, 1, len(images))
This cell allows users to download data to the inputs folder for the demo.
To ensure quality concept tuning, these images should be consistent across a theme but differ in subtle ways like lighting, perspective, distance, and noise. Below is a grid showing the images Now, we have downloaded the images.
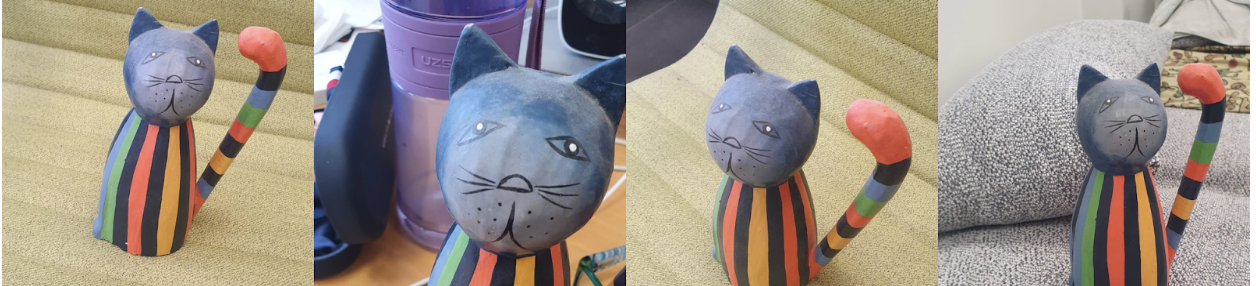
As we can see, the same image is displayed from a variety of angles and perspectives and with diverse backgrounds to prevent over-fitting.
Set training variables
#@markdown `pretrained_model_name_or_path` which Stable Diffusion checkpoint you want to use
pretrained_model_name_or_path = "runwayml/stable-diffusion-v1-5" #@param {type:"string"}
Next, we will instantiate the training variables for model training and those that will correspond to the image data. We will use Runway ML’s Stable Diffusion-v1-5 checkpoint for this demonstration. Be sure to click the acknowledgment to access the model on its homepage, if you have not yet done so.
#@title Settings for your newly created concept
instance_prompt = "a photo of sks toy" #@param {type:"string"}

prior_preservation = False #@param {type:"boolean"}
prior_preservation_class_prompt = "a photo of a cat toy" #@param {type:"string"}
class_prompt=prior_preservation_class_prompt

# Set your data folder path
prior_preservation_class_folder = './inputs'
class_data_root=prior_preservation_class_folder

num_class_images = len(os.listdir(prior_preservation_class_folder))
sample_batch_size = 4
prior_loss_weight = 0.5
Next, we set the settings for our model training.
The instance_prompt is a prompt that should contain a good description of what your object or style is. It is paired together with the initializer word sks.
We can set prior_preservation to True if we want the class of the concept (e.g., toy, dog, painting) to be guaranteed to be preserved. This increases the quality and helps with generalization at the cost of training time.
We then set prior_preservation_class_folder and class_data_root to set the input folder path.
The batch size is set to 4, and the prior_loss_weight is set to .5 to determine the strength of the class for prior preservation. The total number of class images is determined by the folder size.
Teach the model the new concept
Create Dataset classes to facilitate training
To get started teaching the desired concept, we need to instantiate the DreamBoothDataset and PromptDataset classes to handle the organization of the data inputs for training. These Dataset objects are constructed to ensure the input data is optimized for fine-tuning the model. The code for this is shown below:
#@title Setup the Classes
from pathlib import Path
from torchvision import transforms

class DreamBoothDataset(Dataset):
    def __init__(
        self,
        instance_data_root,
        instance_prompt,
        tokenizer,
        class_data_root=None,
        class_prompt=None,
        size=512,
        center_crop=False,
    ):
        self.size = size
        self.center_crop = center_crop
        self.tokenizer = tokenizer

        self.instance_data_root = Path(instance_data_root)
        if not self.instance_data_root.exists():
            raise ValueError("Instance images root doesn't exists.")

        self.instance_images_path = list(Path(instance_data_root).iterdir())
        self.num_instance_images = len(self.instance_images_path)
        self.instance_prompt = instance_prompt
        self._length = self.num_instance_images

        if class_data_root is not None:
            self.class_data_root = Path(class_data_root)
            self.class_data_root.mkdir(parents=True, exist_ok=True)
            self.class_images_path = list(Path(class_data_root).iterdir())
            self.num_class_images = len(self.class_images_path)
            self._length = max(self.num_class_images, self.num_instance_images)
            self.class_prompt = class_prompt
        else:
            self.class_data_root = None

        self.image_transforms = transforms.Compose(
            [
                transforms.Resize(size, interpolation=transforms.InterpolationMode.BILINEAR),
                transforms.CenterCrop(size) if center_crop else transforms.RandomCrop(size),
                transforms.ToTensor(),
                transforms.Normalize([0.5], [0.5]),
            ]
        )

    def __len__(self):
        return self._length

    def __getitem__(self, index):
        example = {}
        instance_image = Image.open(self.instance_images_path[index % self.num_instance_images])
        if not instance_image.mode == "RGB":
            instance_image = instance_image.convert("RGB")
        example["instance_images"] = self.image_transforms(instance_image)
        example["instance_prompt_ids"] = self.tokenizer(
            self.instance_prompt,
            padding="do_not_pad",
            truncation=True,
            max_length=self.tokenizer.model_max_length,
        ).input_ids

        if self.class_data_root:
            class_image = Image.open(self.class_images_path[index % self.num_class_images])
            if not class_image.mode == "RGB":
                class_image = class_image.convert("RGB")
            example["class_images"] = self.image_transforms(class_image)
            example["class_prompt_ids"] = self.tokenizer(
                self.class_prompt,
                padding="do_not_pad",
                truncation=True,
                max_length=self.tokenizer.model_max_length,
            ).input_ids

        return example


class PromptDataset(Dataset):
    def __init__(self, prompt, num_samples):
        self.prompt = prompt
        self.num_samples = num_samples

    def __len__(self):
        return self.num_samples

    def __getitem__(self, index):
        example = {}
        example["prompt"] = self.prompt
        example["index"] = index
        return example
Load in model checkpoints
#@title Load the Stable Diffusion model
#@markdown Please read and if you agree accept the LICENSE [here](https://huggingface.co/runwayml/stable-diffusion-v1-5) if you see an error
# Load models and create wrapper for stable diffusion

text_encoder = CLIPTextModel.from_pretrained(
    pretrained_model_name_or_path, subfolder="text_encoder"
)
vae = AutoencoderKL.from_pretrained(
    pretrained_model_name_or_path, subfolder="vae"
)
unet = UNet2DConditionModel.from_pretrained(
    pretrained_model_name_or_path, subfolder="unet"
)
tokenizer = CLIPTokenizer.from_pretrained(
    pretrained_model_name_or_path,
    subfolder="tokenizer",
)
Next, we will load in the three separate components we will need to run this tuning process. These together form the full pipeline for the model. The final output for our concept will be in a similar format. Later in this tutorial, we will show how to convert this repository concept format into a classic Stable Diffusion checkpoint.
Remember, we need to visit the v1-5 checkpoint page and accept the user agreement to download these files.
Set up arguments for training
Now that the model has been set up, we need to instantiate the training parameters. By running the cell below, we instantiate the tuning arguments for the DreamBooth training process using Namespace.
#@title Setting up all training args
!mkdir outputs

save_path = 'outputs'
from argparse import Namespace
args = Namespace(
    pretrained_model_name_or_path=pretrained_model_name_or_path,
    resolution=512,
    center_crop=True,
    instance_data_dir=save_path,
    instance_prompt=instance_prompt,
    learning_rate=5e-06,
    max_train_steps=500,
    train_batch_size=1,
    gradient_accumulation_steps=2,
    max_grad_norm=1.0,
    mixed_precision="no", # set to "fp16" for mixed-precision training.
    gradient_checkpointing=True, # set this to True to lower the memory usage.
    use_8bit_adam=True, # use 8bit optimizer from bitsandbytes
    seed=34354,
    with_prior_preservation=prior_preservation,
    prior_loss_weight=prior_loss_weight,
    sample_batch_size=2,
    class_data_dir=prior_preservation_class_folder,
    class_prompt=None,
    num_class_images=num_class_images,
    output_dir="dreambooth-concept",
)
In particular, we may want to edit:
max_train_steps: The arguably most important argument - change this to raise or lower training epochs, which can drastically affect the outcome.seed: The seed of the sample images generated to compute the loss during training - has a significant effect on the final results of sample images, and what features are considered salient to the model after training.output_dir: The final output directory for your trained Dreambooth conceptresolution: The size of the input training images.mixed_precision: This argument tells the model to use both full and half-precision to accelerate training even further.
Define the training function with accelerate
Here, we instantiate the training function for the training run below. This uses the accelerator package to add the ability to train this function on multi-GPU configurations. Follow the comments within to see what each step of the training function takes before running the code in the cell below.
#@title Training function
from accelerate.utils import set_seed
def training_function(text_encoder, vae, unet):
    logger = get_logger(__name__)

    accelerator = Accelerator(
        gradient_accumulation_steps=args.gradient_accumulation_steps,
        mixed_precision=args.mixed_precision,
    )

    set_seed(args.seed)

    if args.gradient_checkpointing:
        unet.enable_gradient_checkpointing()

    # Use 8-bit Adam for lower memory usage or to fine-tune the model in 16GB GPUs
    if args.use_8bit_adam:
        optimizer_class = bnb.optim.AdamW8bit
    else:
        optimizer_class = torch.optim.AdamW

    optimizer = optimizer_class(
        unet.parameters(),  # only optimize unet
        lr=args.learning_rate,
    )

    noise_scheduler = DDPMScheduler(
        beta_start=0.00085, beta_end=0.012, beta_schedule="scaled_linear", num_train_timesteps=1000
    )

    train_dataset = DreamBoothDataset(
        instance_data_root='inputs',
        instance_prompt=args.instance_prompt,
        class_data_root=args.class_data_dir if args.with_prior_preservation else None,
        class_prompt=args.class_prompt,
        tokenizer=tokenizer,
        size=args.resolution,
        center_crop=args.center_crop,
    )

    def collate_fn(examples):
        input_ids = [example["instance_prompt_ids"] for example in examples]
        pixel_values = [example["instance_images"] for example in examples]

        # concat class and instance examples for prior preservation
        if args.with_prior_preservation:
            input_ids += [example["class_prompt_ids"] for example in examples]
            pixel_values += [example["class_images"] for example in examples]

        pixel_values = torch.stack(pixel_values)
        pixel_values = pixel_values.to(memory_format=torch.contiguous_format).float()

        input_ids = tokenizer.pad({"input_ids": input_ids}, padding=True, return_tensors="pt").input_ids

        batch = {
            "input_ids": input_ids,
            "pixel_values": pixel_values,
        }
        return batch

    train_dataloader = torch.utils.data.DataLoader(
        train_dataset, batch_size=args.train_batch_size, shuffle=True, collate_fn=collate_fn
    )

    unet, optimizer, train_dataloader = accelerator.prepare(unet, optimizer, train_dataloader)

    # Move text_encode and vae to gpu
    text_encoder.to(accelerator.device)
    vae.to(accelerator.device)

    # We need to recalculate our total training steps as the size of the training dataloader may have changed.
    num_update_steps_per_epoch = math.ceil(len(train_dataloader) / args.gradient_accumulation_steps)
    num_train_epochs = math.ceil(args.max_train_steps / num_update_steps_per_epoch)

    # Train!
    total_batch_size = args.train_batch_size * accelerator.num_processes * args.gradient_accumulation_steps

    logger.info("***** Running training *****")
    logger.info(f"  Num examples = {len(train_dataset)}")
    logger.info(f"  Instantaneous batch size per device = {args.train_batch_size}")
    logger.info(f"  Total train batch size (w. parallel, distributed & accumulation) = {total_batch_size}")
    logger.info(f"  Gradient Accumulation steps = {args.gradient_accumulation_steps}")
    logger.info(f"  Total optimization steps = {args.max_train_steps}")
    # Only show the progress bar once on each machine.
    progress_bar = tqdm(range(args.max_train_steps), disable=not accelerator.is_local_main_process)
    progress_bar.set_description("Steps")
    global_step = 0

    for epoch in range(num_train_epochs):
        unet.train()
        for step, batch in enumerate(train_dataloader):
            with accelerator.accumulate(unet):
                # Convert images to latent space
                with torch.no_grad():
                    latents = vae.encode(batch["pixel_values"]).latent_dist.sample()
                    latents = latents * 0.18215

                # Sample noise that we'll add to the latents
                noise = torch.randn(latents.shape).to(latents.device)
                bsz = latents.shape[0]
                # Sample a random timestep for each image
                timesteps = torch.randint(
                    0, noise_scheduler.config.num_train_timesteps, (bsz,), device=latents.device
                ).long()

                # Add noise to the latents according to the noise magnitude at each timestep
                # (this is the forward diffusion process)
                noisy_latents = noise_scheduler.add_noise(latents, noise, timesteps)

                # Get the text embedding for conditioning
                with torch.no_grad():
                    encoder_hidden_states = text_encoder(batch["input_ids"])[0]

                # Predict the noise residual
                noise_pred = unet(noisy_latents, timesteps, encoder_hidden_states).sample

                if args.with_prior_preservation:
                    # Chunk the noise and noise_pred into two parts and compute the loss on each part separately.
                    noise_pred, noise_pred_prior = torch.chunk(noise_pred, 2, dim=0)
                    noise, noise_prior = torch.chunk(noise, 2, dim=0)

                    # Compute instance loss
                    loss = F.mse_loss(noise_pred, noise, reduction="none").mean([1, 2, 3]).mean()

                    # Compute prior loss
                    prior_loss = F.mse_loss(noise_pred_prior, noise_prior, reduction="none").mean([1, 2, 3]).mean()

                    # Add the prior loss to the instance loss.
                    loss = loss + args.prior_loss_weight * prior_loss
                else:
                    loss = F.mse_loss(noise_pred, noise, reduction="none").mean([1, 2, 3]).mean()

                accelerator.backward(loss)
                if accelerator.sync_gradients:
                    accelerator.clip_grad_norm_(unet.parameters(), args.max_grad_norm)
                optimizer.step()
                optimizer.zero_grad()

            # Checks if the accelerator has performed an optimization step behind the scenes
            if accelerator.sync_gradients:
                progress_bar.update(1)
                global_step += 1

            logs = {"loss": loss.detach().item()}
            progress_bar.set_postfix(**logs)

            if global_step >= args.max_train_steps:
                break

        accelerator.wait_for_everyone()

    # Create the pipeline using using the trained modules and save it.
    if accelerator.is_main_process:
        pipeline = StableDiffusionPipeline(
            text_encoder=text_encoder,
            vae=vae,
            unet=accelerator.unwrap_model(unet),
            tokenizer=tokenizer,
            scheduler=PNDMScheduler(
                beta_start=0.00085, beta_end=0.012, beta_schedule="scaled_linear", skip_prk_steps=True
            ),
            safety_checker=StableDiffusionSafetyChecker.from_pretrained("CompVis/stable-diffusion-safety-checker"),
            feature_extractor=CLIPFeatureExtractor.from_pretrained("openai/clip-vit-base-patch32"),
        )
        pipeline.save_pretrained(args.output_dir)
Run training
#@title Run training
import accelerate
accelerate.notebook_launcher(training_function, args=(text_encoder, vae, unet), num_processes =1)
with torch.no_grad():
    torch.cuda.empty_cache()
Finally, we are ready to begin fine-tuning our DreamBooth concept. If we are using more than one GPU, we may now take advantage of acceleration and change the num_processes argument accordingly.
Set up the inference pipeline
Once training has been completed, we can use the code in the inference section to sample the model with any prompt.
#@title Set up the pipeline
try:
    pipe
except NameError:
    pipe = StableDiffusionPipeline.from_pretrained(
        args.output_dir,
        torch_dtype=torch.float16,
    ).to("cuda")
We first instantiate the pipe in half precision format for less expensive sampling. The StableDiffusionPipeline.from_pretrained() function takes in our path to the concept directory to load in the fine-tuned model using the binary files inside.
We can then load our prompt variable into this pipeline to generate images corresponding to our desired output.
#@title Run the Stable Diffusion pipeline

prompt = "a photo of a sks cat toy riding a bicycle" #@param {type:"string"}

num_samples = 3  #@param {type:"number"}
num_rows = 3 #@param {type:"number"}

all_images = []
for _ in range(num_rows):
    images = pipe([prompt] * num_samples, num_inference_steps=75, guidance_scale=7.5, seed = 'random').images
    all_images.extend(images)

grid = image_grid(all_images, num_samples, num_rows)
grid
Following the demo, our prompt “a photo of a cat toy riding a bicycle” is called. We can then use num_samples and num_rows with the image_grid function to place them within a single photo grid. Let’s look at an example of these images generated with the prompt “a photo of cat toy riding a bicycle” from a model trained on the sample images for a relatively short 250 epochs:

The generated images retain many qualities of the original cat toy images. The bottom center image closely resembles the original object. The remaining images display varying degrees of similarity to the original sample as the model attempts to position it on the bicycle. This is because a cat riding a bike is unlikely to be present in the original data, making it harder to recreate with diffusion than scattered features. The final images show a random collection of Dreambooth concept aspects combined with different prompt-related features. With further training, these images could better represent our prompt.
Let’s examine the results from a similar concept extended to 500 epochs of training:

As you can see, several of these samples are more accurately approximating the human, qualitative interpretation of the prompt than the 250 epoch concept. In particular, the three samples in the middle row show all of the features of a clay cat toy riding a mostly accurate bicycle. The other rows feature a more realistic cat object but still show more complete bicycle images than the previous test. This difference is likely due to a lack of a confounding effect in the further trained model during inference from the concept object’s features. By being more exposed to the initial data, the recreation of the central object in the concept is less likely to interfere with the generation of the additional features extrapolated from the prompt - in this case, a bicycle.
Furthermore, it is important to call attention to the consistent variation across each row caused by the random seed. Each row shows similar salient features that are not conserved across the entire grid. This shows clear evidence that the seed effectively controls the randomness of the concept’s inference. A seed is also applied during training, and altering it can have major effects on the results of concept training. Be sure to test out various seeds in both tasks to get the best for your final outputs.
To continue from this stage, it’s recommended to try extending your training to 1000 epochs to see how our outputs improve or degrade. As the number of epochs grows, we need to be wary of overfitting. If our inputted images are not variable enough in terms of background features and perspectives of objects, and training is extensive enough, it will be difficult to manipulate the objects out of their original positions during generation due to this over-training. Make sure the input images contain diverse content to ensure a more robust final output for inference.
Convert the model from Diffusers format to the original Stable Diffusion checkpoint file
Finally, now that we have finished creating our Dreambooth concept, we are left with a Diffusers-compatible folder at the directory dreambooth-concept. If we want to use this with classic Stable Diffusion scripts or other projects like the Stable Diffusion Web UI, then we can use the following script to create a shareable, downloadable .ckpt file.
# Params
# --model_path = Path to the model to convert.
# --checkpoint_path = Path to the output model.
# --half = store_true, Save weights in half precision/


!git clone https://github.com/huggingface/diffusers

%cd diffusers/scripts
!python convert_diffusers_to_original_stable_diffusion.py --model_path <path to dreambooth concept> --checkpoint_path <name/path of your new model>
%cd ~/../notebooks
This script will clone the huggingface/diffusers library to our Notebook. We then change directories into scripts to make use of the convert_diffusers_to_original_stable_diffusion.py script. Simply input the model_path as the path to your repository holding the Dreambooth concept, the desired output path and name for your new checkpoint to checkpoint_path, and use the half flag if you would like to save it in half-precision format for less computationally expensive inference.
Conclusion
This tutorial is based on a Jupyter Notebook from the HuggingFace Diffusers Notebooks repo. We walked through the complete process of creating a Dreambooth concept from scratch and demonstrated how you can adapt this notebook for any type of image dataset to generate new, personalized concepts. Using text prompts, we showed how to sample from the trained model to produce novel images that reflect the original concept. We also explored how changes in training duration and seed values affect the output. To wrap up, we covered how to export the trained concept as a .ckpt file, making it easy to reuse in future projects—including those running on platforms like DigitalOcean with powerful GPU Droplets for faster training and inference.
Thanks for learning with the DigitalOcean Community. Check out our offerings for compute, storage, networking, and managed databases.
About the author(s)
With a strong background in data science and over six years of experience, I am passionate about creating in-depth content on technologies. Currently focused on AI, machine learning, and GPU computing, working on topics ranging from deep learning frameworks to optimizing GPU-based workloads.
Still looking for an answer?
This textbox defaults to using Markdown to format your answer.
You can type !ref in this text area to quickly search our full set of tutorials, documentation & marketplace offerings and insert the link!
 This work is licensed under a Creative Commons Attribution-NonCommercial- ShareAlike 4.0 International License.
Become a contributor for community
Get paid to write technical tutorials and select a tech-focused charity to receive a matching donation.

DigitalOcean Documentation
Full documentation for every DigitalOcean product.

Resources for startups and SMBs
The Wave has everything you need to know about building a business, from raising funding to marketing your product.
The developer cloud
Scale up as you grow — whether you're running one virtual machine or ten thousand.

Get started for free
Sign up and get $200 in credit for your first 60 days with DigitalOcean.*

*This promotional offer applies to new accounts only.