
Introduction
Kubernetes traffic management has evolved significantly since the introduction of Ingress controllers. While Kubernetes Ingress served as the foundation for HTTP traffic routing, it quickly revealed limitations in complex, multi-tenant environments.
Imagine you’re working on a growing Kubernetes platform where you need to:
- Expose services securely across multiple teams
- Implement advanced routing based on headers and query parameters
- Manage traffic policies without vendor-specific annotations
- Scale traffic management without operational complexity
This is where Kubernetes Gateway API transforms your approach to service networking. As the next evolution beyond Ingress, Gateway API provides a role-oriented, extensible, and vendor-neutral way to manage HTTP and HTTPS traffic in Kubernetes clusters.
You’ll learn Gateway API using Cilium Gateway on DigitalOcean Kubernetes (DOKS), which means zero additional controller deployment and native CNI integration.
In this comprehensive tutorial, you will learn about the Gateway API fundamentals and implement a production-ready HTTP service with advanced routing capabilities using Cilium’s native Gateway support.
Key Takeaways
This comprehensive Kubernetes Gateway API tutorial covers everything from basic concepts to production deployment:
Core Concepts & Architecture
- Gateway API vs Ingress Controller: Understand the fundamental differences and when to migrate from traditional Ingress
- Cilium Gateway Implementation: Leverage DOKS native Cilium support for zero-overhead Gateway API deployment
- Role-Based Resource Model: Master GatewayClass, Gateway, and HTTPRoute separation for better team collaboration
Practical Implementation
- HTTP Traffic Routing: Configure path-based routing, header matching, and query parameter filtering
- Advanced Traffic Management: Implement traffic splitting, load balancing, and cross-namespace routing
- Production Deployment: Set up DNS integration with ExternalDNS and proper service discovery
Best Practices & Optimization
- Multi-Tenant Environments: Design scalable Gateway configurations for multiple teams
- Security Considerations: Implement proper access controls and traffic policies
- Monitoring & Observability: Integrate with Kubernetes-native monitoring solutions
Prerequisites: Basic Kubernetes knowledge and a running DOKS cluster. New to Kubernetes? Start with our Kubernetes Fundamentals guide.
Prerequisites
Before starting this tutorial, ensure you have:
- A running VPC Native DigitalOcean Kubernetes cluster (version 1.33+)
kubectlinstalled and configured to talk to your cluster- The Gateway API CRDs installed (DOKS includes Cilium, which supports this by default)
- A registered domain name and DNS access
Note: Need help with prerequisites? Check out these guides:
Note that in domain dolearn.xyz is used in the examples, be sure to replace those references with your own domain.
Why Gateway API? A Better Way to Do HTTP Routing
If you’ve worked with Kubernetes Ingress, you’ve probably felt its limitations. While Ingress opened the door for exposing HTTP(S) workloads, it quickly showed its cracks:
- Relying on controller-specific annotations for advanced features
- Struggling with multi-tenant setups
- Blurring the lines of responsibility between infrastructure teams and developers
As platforms grow more complex, think multi-team environments, canary rollouts, and fine-grained traffic shaping, then using Ingress alone starts to feel like duct tape.
This is where the Gateway API comes in. Designed by Kubernetes SIG-Network as the next evolution of service networking, it brings a role-oriented, portable, and extensible model to traffic routing.
If you’re new to Kubernetes networking, check out our Kubernetes Networking Fundamentals tutorial first to understand the foundation.
Key Advantages of Gateway API Over Ingress**
1. Rich, expressive routing
Go beyond simple host/path matching. Gateway API supports header conditions, query parameters, and weighted traffic splitting out of the box, making canary releases, A/B tests, and blue-green deployments first-class citizens, not hacks hidden in annotations.
2. Clear role separation
Gateway API introduces a clean division of responsibilities using three kinds of resources:
- Infrastructure providers define GatewayClass
- Cluster operators deploy Gateway
- Developers define HTTPRoute (or other Route resources such as GRPCRoute)
We provide a deeper look at each resource later in this tutorial.
These resources prevent permission overlap, simplifies governance, and fits naturally into multi-team workflows.
3. Cross-namespace and multi-tenancy ready
Gateway API natively supports cross-namespace routing which is ideal for large platforms or organizations where services and teams span multiple namespaces.
4. Vendor-neutral and portable
No more vendor lock-in. Gateway API defines standard CRDs, so your routing logic can seamlessly move across controllers from different vendors.
5. Advanced traffic control, without annotation chaos
Retries, mirroring, filters, and traffic policies are first-class constructs or well-defined extensions. No need to rely on undocumented annotations or vendor-specific hacks.
DOKS and Cilium Integration
On DigitalOcean Kubernetes (DOKS), Cilium is the default CNI implementation. This has an important implication for teams choosing between Ingress and Gateway API:
If you continue using Ingress, you’re responsible for running your own ingress controller (NGINX, HAProxy, Traefik, etc.). That means extra overhead—deploying it, keeping it healthy, and staying on top of upgrades.
With the Gateway API, that burden goes away. Since DOKS ships with Cilium by default, Gateway API support is already built in. HTTP routing becomes a native, fully managed feature of the control plane, with no extra components for you to maintain.
For more details, see our guides on setting up a DOKS cluster and Cilium networking features.
Gateway API Building Blocks
GatewayClass
A GatewayClass defines the type of gateway your cluster can use. Think of it as a template that tells Kubernetes how Gateways should behave. In our case the Gateway Class is Cilium. The GatewayClass is created and managed by DigitalOcean.
Gateway
A Gateway is an instance of a GatewayClass. It represents the actual entry point into your cluster, backed by a Load Balancer in a Cloud Setup. A Gateway is created by someone in a DevOps or platform role, usually the team that manages Kubernetes clusters and shared infrastructure.
A Gateway brings together three main things:
- GatewayClassName
- Ties the Gateway to a particular implementation.
- Listeners
- These are like the “ports of entry” into the cluster.
- A listener specifies:
- Protocol (e.g., HTTP, HTTPS, TCP, gRPC).
- Port (like 80 or 443).
- Hostname(s) (e.g.,
example.com,*.app.io). - TLS termination (if the Gateway should handle certificates).
- Route binding rules — which kinds of routes can attach here.
- Essentially, listeners are how you define what kind of traffic this Gateway is willing to accept and process.
- Addresses
- The actual IP addresses or load balancer frontends that the Gateway controller provisions.
- This could be a cloud load balancer, a cluster IP, or even just a node port setup depending on your environment.
HTTPRoutes
Defines HTTP routing rules for one or more services in your cluster. HTTPRoutes are typically created by developers.
An HTTPRoute consists of:
- Parent References
These define which Gateways and which specific listeners on those Gateways this route is allowed to attach to. - Hostnames
- HTTPRoutes can narrow down which hostnames they apply to (e.g., api.example.com, shop.example.com).
- If multiple routes share a Gateway, hostnames make sure traffic goes to the right backend.
- Rules
- Where matching and routing happens. You can match based on:
- Path prefixes (
/api,/shop) - Headers (
X-Canary: true). - Query parameters.
- Filters: Apply transformations like redirects, header rewrites, request/response modifications, or traffic mirroring.
- BackendRefs: Specify destination Services (or backends), with support for traffic splitting via weights.
- Timeouts: Control request lifecycle with limits (e.g., request timeout).
Let’s deploy a sample application and expose it using a Gateway and an HTTPRoute
Step 1 - Deploy a Sample App
Run this command from your terminal (make sure you have kubectl configured to connect to your DigitalOcean Kubernetes cluster):
kubectl apply \
    -f https://raw.githubusercontent.com/istio/istio/release-1.11/samples/bookinfo/platform/kube/bookinfo.yaml
Applying the bookinfo.yaml manifest spins up the four Bookinfo microservices:productpage, details, reviews, and ratings—with the core
- Services on port
9080to make each microservice discoverable. - Deployments to run the Pods (details and ratings have v1, productpage has v1, and reviews has v1, v2, and v3).
- ServiceAccounts to give each service its own identity.
Step 2 - Deploy the Cilium Gateway
When you create a Gateway, you also decide how it will be shared:
-
Dedicated Gateway: Deployed in the same namespace as the application and its HTTPRoutes. This model works well when each team or app owns its own Gateway.
-
Shared Gateway: Deployed in a different namespace and shared across multiple apps. In this case, the Gateway owner must explicitly allow other namespaces to attach routes using the allowedRoutes field.
For our use case, let’s create a Dedicated Gateway.
apiVersion: gateway.networking.k8s.io/v1
kind: Gateway
metadata:
  name: cilium-gateway-http
spec:
  gatewayClassName: cilium
  listeners:
  - protocol: HTTP
    port: 80
    name: web-gw
    allowedRoutes:
      namespaces:
        from: Same
The Gateway and the app’s HTTPRoutes live in the same namespace. Only the sample-app team can attach routes to it, which keeps routing isolated and prevents other teams/namespaces from using this entry point.
Once the above manifest is applied, two resources will be created. The Gateway and the Service of type LoadBalancer. Note it can take a few minutes for the load balancer to be created and for its IP address to be displayed.
kubectl get gateways
OutputNAME                  CLASS    ADDRESS           PROGRAMMED   AGE
cilium-gateway-http   cilium   134.209.130.13    True         47m
kubectl get svc -o wide | grep LoadBalancer
Outputcilium-gateway-cilium-gateway-http LoadBalancer 10.108.72.44 138.197.230.74 80:32015/TCP 50m <none>
Step 3 - Create the HTTPRoute
Once you have a Gateway in place, the next step is to define HTTPRoutes. These tell the Gateway how to direct incoming requests to your application services.
apiVersion: gateway.networking.k8s.io/v1
kind: HTTPRoute
metadata:
  name: http-app-test
spec:
  parentRefs:
  - name: cilium-gateway-http
  hostnames:
  - "httptest.dolearn.xyz"
  rules:
  - matches:
    - path:
        type: PathPrefix
        value: /details
    backendRefs:
    - name: details
      port: 9080

  - matches:
    - headers:
      - type: Exact
        name: magic
        value: foo
      queryParams:
      - type: Exact
        name: great
        value: example
      path:
        type: PathPrefix
        value: /
      method: GET
    backendRefs:
    - name: productpage
      port: 9080
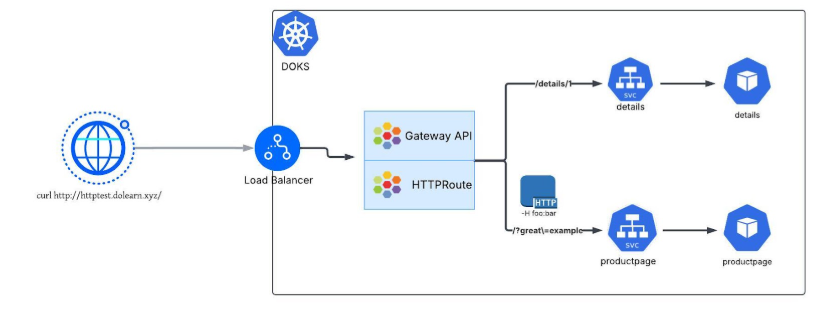
What it does?
- Links to a Gateway
parentRefspoints to the Gatewaycilium-gateway-httpin thesamenamespace.- This tells the cluster which Gateway should process these routes.
- Defines hostnames
- Requests for
httptest.dolearn.xyzwill be matched by this HTTPRoute.
- Requests for
- Sets routing rules
First rule: Requests with paths starting with/detailsgo to thedetailsservice on port 9080.-
Second rule: Requests with
- Header
magic: foo - Query param
great=example - Path starting with
/ - Method
GET
are routed to theproductpageservice on port 9080.
- Header
-
Step 4 - Setting up ExternalDNS with DigitalOcean (Optional)
ExternalDNS automates the management of DNS records in your provider (in this case, DigitalOcean) based on Kubernetes resources such as Services, Ingresses, and Gateway API routes.
1. Create a DigitalOcean API Token
You’ll need a Personal Access Token with write access to manage DNS records.
2. Store the Token as a Kubernetes Secret
Create a Kubernetes Secret that ExternalDNS will use to authenticate with DigitalOcean:
kubectl create secret generic digitalocean-dns \
  --from-literal=access-token=<YOUR_DIGITALOCEAN_TOKEN>
3. Add the ExternalDNS Helm Repository
helm repo add external-dns https://kubernetes-sigs.github.io/external-dns/
helm repo update
4. Configure Values for Helm Deployment
env: # Passes the DigitalOcean token from the secret
  - name: DO_TOKEN
    valueFrom:
      secretKeyRef:
        name: digitalocean-dns
        key: access-token

provider: # ExternalDNS provider configuration
  name: digitalocean

policy: sync # Ensures ExternalDNS continuously reconciles DNS records
txtOwnerId: gateway-api # Ensures ExternalDNS does not conflict others using this domain

sources: # Kubernetes resources to watch and create DNS records for
  - service
  - ingress
  - gateway-grpcroute
  - gateway-httproute
5. Install ExternalDNS
Deploy ExternalDNS using Helm:
helm install external-dns external-dns/external-dns -f values.yaml
6. Verify DNS Records
After deployment, ExternalDNS should automatically create DNS records for your Services/Ingresses.
You can verify with:
dig +short httptest.dolearn.xyz
138.197.230.74
Reference: https://kubernetes-sigs.github.io/external-dns/latest/
Alternatively, you can manually add the DNS records: https://docs.digitalocean.com/products/networking/dns/how-to/manage-records/
Step 5 - Make HTTP Requests
Now that the Gateway is ready, you can make HTTP requests to the app using the service.
curl --fail -s http://httptest.dolearn.xyz/details/1 | jq
Output{
  "id": 1,
  "author": "William Shakespeare",
  "year": 1595,
  "type": "paperback",
  "pages": 200,
  "publisher": "PublisherA",
  "language": "English",
  "ISBN-10": "1234567890",
  "ISBN-13": "123-1234567890"
}
curl -v -H 'magic: foo' http://httptest.dolearn.xyz\?great\=example
Output* Host httptest.dolearn.xyz:80 was resolved.
* IPv6: (none)
* IPv4: 134.209.130.13
*   Trying 134.209.130.13:80...
* Connected to httptest.dolearn.xyz (134.209.130.13) port 80
> GET /?great=example HTTP/1.1
> Host: httptest.dolearn.xyz
> User-Agent: curl/8.7.1
> Accept: */*
> magic: foo
>
* Request completely sent off
< HTTP/1.1 200 OK
< content-type: text/html; charset=utf-8
< content-length: 1683
< server: envoy
< date: Mon, 25 Aug 2025 13:21:59 GMT
< x-envoy-upstream-service-time: 8
<
<!DOCTYPE html>
<html>
  <head>
    <title>Simple Bookstore App</title>
<meta charset="utf-8">
<meta http-equiv="X-UA-Compatible" content="IE=edge">
<meta name="viewport" content="width=device-width, initial-scale=1">

<!-- Latest compiled and minified CSS -->
<link rel="stylesheet" href="static/bootstrap/css/bootstrap.min.css">

<!-- Optional theme -->
<link rel="stylesheet" href="static/bootstrap/css/bootstrap-theme.min.css">

  </head>
  <body>


<p>
    <h3>Hello! This is a simple bookstore application consisting of three services as shown below</h3>
</p>

<table class="table table-condensed table-bordered table-hover"><tr><th>name</th><td>http://details:9080</td></tr><tr><th>endpoint</th><td>details</td></tr><tr><th>children</th><td><table class="table table-condensed table-bordered table-hover"><tr><th>name</th><th>endpoint</th><th>children</th></tr><tr><td>http://details:9080</td><td>details</td><td></td></tr><tr><td>http://reviews:9080</td><td>reviews</td><td><table class="table table-condensed table-bordered table-hover"><tr><th>name</th><th>endpoint</th><th>children</th></tr><tr><td>http://ratings:9080</td><td>ratings</td><td></td></tr></table></td></tr></table></td></tr></table>

<p>
    <h4>Click on one of the links below to auto generate a request to the backend as a real user or a tester
    </h4>
</p>
<p><a href="/productpage?u=normal">Normal user</a></p>
<p><a href="/productpage?u=test">Test user</a></p>


<!-- Latest compiled and minified JavaScript -->
<script src="static/jquery.min.js"></script>

<!-- Latest compiled and minified JavaScript -->
<script src="static/bootstrap/js/bootstrap.min.js"></script>

  </body>
</html>
* Connection #0 to host httptest.dolearn.xyz left intact
And this is it! You have successfully deployed a sample application and exposed it using a Gateway and an HTTPRoute.
FAQs
1. How do I use Gateway API in Kubernetes?
To use Gateway API in Kubernetes, follow these steps:
- Install Gateway API CRDs (automatically included in DOKS with Cilium)
- Deploy a Gateway Controller (Cilium Gateway is pre-installed on DOKS)
- Create a GatewayClass resource (managed by DigitalOcean)
- Define a Gateway for your traffic entry point
- Configure HTTPRoute resources for application-specific routing
DOKS Advantage: With Cilium as the default CNI, Gateway API support is built-in—no additional controller deployment required.
2. What’s the difference between Gateway API and Ingress controller?
Gateway API is the modern evolution of Kubernetes traffic management:
Ingress Limitations:
- Controller-specific annotations for advanced features
- Single resource model mixing infrastructure and application concerns
- Limited multi-tenancy support
Gateway API Advantages:
- Role-oriented design: Separate resources for infrastructure teams (Gateway) and developers (HTTPRoute)
- Native feature support: Traffic splitting, header matching, cross-namespace routing without annotations
- Vendor portability: Standardized across different implementations
3. Can I migrate from Ingress to Gateway API without downtime?
Yes! Gateway API supports gradual migration strategies:
- Parallel deployment: Run Gateway API alongside existing Ingress controllers
- Service-by-service migration: Move applications incrementally
- Blue-green migration: Test Gateway API with non-production traffic first
- Traffic splitting: Use Gateway API’s native traffic splitting for canary deployments
Learn more in our Kubernetes migration guide.
4. How does Cilium Gateway compare to other Gateway API implementations?
Cilium Gateway offers unique advantages on DOKS:
- Native CNI integration: No separate controller pods or additional resource overhead
- eBPF-powered performance: Hardware-accelerated traffic processing
- Built-in observability: Integrated with Cilium’s monitoring capabilities
- Automatic scaling: Scales with your cluster nodes without manual configuration
5. What are Gateway API examples for common use cases?
Common Gateway API implementation patterns:
Path-based routing:
rules:
- matches:
  - path:
      type: PathPrefix
      value: /api
  backendRefs:
  - name: api-service
Header-based routing:
rules:
- matches:
  - headers:
    - name: "version"
      value: "v2"
  backendRefs:
  - name: api-v2-service
Traffic splitting:
backendRefs:
- name: service-v1
  weight: 80
- name: service-v2
  weight: 20
6. Is Gateway API ready for production environments?
Absolutely! Gateway API has achieved GA status and is production-ready:
- Stable API: v1 API guarantees backward compatibility
- Widespread adoption: Used by major cloud providers and enterprises
- Active development: Continuous improvements and feature additions
- Strong ecosystem: Growing number of implementations and tools
On DOKS: Cilium Gateway is fully supported and recommended for production workloads.
Conclusion
Congratulations! You’ve successfully implemented a production-ready Kubernetes Gateway API setup with Cilium. Here’s what you’ve accomplished:
- Deployed the Bookinfo microservices with proper service discovery
- Created a Cilium Gateway leveraging DOKS native CNI integration
- Configured advanced HTTPRoute rules with path and header-based routing
- Set up automated DNS management with ExternalDNS integration
- Tested real-world traffic scenarios with multiple routing conditions
Next Steps
Now that we’ve covered the basics of Gateway API, check out this follow-up tutorial that demonstrates how to configure TLS using Gateway API with popular Kubernetes controllers such as cert-manager and external-dns.
In addition to setting up HTTPS you can also consider these advanced implementations:
- Configure OAuth authentication with external providers
- Set up Prometheus monitoring for Gateway metrics
Explore our comprehensive Kubernetes tutorial library covering everything from basics to enterprise patterns.
Join the DigitalOcean Community to share your Gateway API implementations and learn from other developers.
Thanks for learning with the DigitalOcean Community. Check out our offerings for compute, storage, networking, and managed databases.
About the author(s)
A Senior Solutions Architect at DigitalOcean focusing on Cloud Architecture, Kubernetes, Automation and Infrastructure-as-Code.
I help Businesses scale with AI x SEO x (authentic) Content that revives traffic and keeps leads flowing | 3,000,000+ Average monthly readers on Medium | Sr Technical Writer @ DigitalOcean | Ex-Cloud Consultant @ AMEX | Ex-Site Reliability Engineer(DevOps)@Nutanix
Still looking for an answer?
This textbox defaults to using Markdown to format your answer.
You can type !ref in this text area to quickly search our full set of tutorials, documentation & marketplace offerings and insert the link!
Is it possible to use a Terraform way to create the Cilium Gateway? I don’t want to use a “Kubernetes_manifest”. Is there another way?
 This work is licensed under a Creative Commons Attribution-NonCommercial- ShareAlike 4.0 International License.
Become a contributor for community
Get paid to write technical tutorials and select a tech-focused charity to receive a matching donation.

DigitalOcean Documentation
Full documentation for every DigitalOcean product.

Resources for startups and SMBs
The Wave has everything you need to know about building a business, from raising funding to marketing your product.
The developer cloud
Scale up as you grow — whether you're running one virtual machine or ten thousand.

Get started for free
Sign up and get $200 in credit for your first 60 days with DigitalOcean.*

*This promotional offer applies to new accounts only.