Sr Technical Writer
Introduction
In this tutorial, you will build a multimodal AI assistant using JavaScript that can process text and generate images through OpenAI’s APIs. Your assistant will feature a modern, ChatGPT-like interface built with React and Next.js, capable of handling conversations and creating images using GPT-4o’s vision capabilities.
By the end of this tutorial, you will have created a fully functional AI assistant that can engage in natural conversations and generate images based on text descriptions. You’ll gain hands-on experience with modern JavaScript frameworks, API integration, and building responsive user interfaces that handle real-time AI interactions.
Furthermore, you will deploy your AI assistant to the App Platform using the DigitalOcean Model Context Protocol (MCP) server, ensuring a seamless integration with the cloud infrastructure and a scalable deployment strategy.
Prerequisites
To complete this tutorial, you will need:
- Node.js version 18 or higher installed on your local machine. You can follow How To Install Node.js and Create a Local Development Environment for your operating system.
- A code editor such as Cursor installed on your computer.
- An OpenAI API key. You can obtain one by creating an account at OpenAI’s platform.
- Basic familiarity with JavaScript and React. To build your skills, check out the How To Code in JavaScript series.
- A GitHub account for version control.
- DigitalOcean MCP server installed in your Cursor IDE.
Step 1 — Setting Up Your Development Environment
In this step, you will create a new Next.js project and install the necessary dependencies for building your AI assistant.
First, create a new Next.js application using the create-next-app command:
npx create-next-app@latest ai-assistant --typescript --tailwind --app
When prompted, select the following options:
- Would you like to use ESLint? Yes
- Would you like to use src/ directory? Yes
- Would you like to customize the default import alias? No
This command will create a new Next.js project with TypeScript, Tailwind CSS, and the necessary dependencies for building your AI assistant.
Next, navigate to the project directory:
cd ai-assistant
Next, install the OpenAI SDK and additional dependencies for handling the chat interface:
npm install openai react-markdown remark-gfm
The openai package provides the official JavaScript client for interacting with OpenAI’s APIs. The react-markdown and remark-gfm packages will help render formatted responses from the AI assistant.
Create a .env.local file in your project root to store your OpenAI API key:
touch .env.local
Add your OpenAI API key to the .env.local file:
OPENAI_API_KEY=your_openai_api_key
Replace your_openai_api_key_here with your actual OpenAI API key. This environment variable will keep your API key secure and separate from your code.
You have now set up your development environment with Next.js and the necessary dependencies. In the next step, you will create the API endpoint for handling AI requests.
Step 2 — Creating the API Endpoint
In this step, you will create the API endpoint for handling AI requests.
In this step, you will create a Next.js API route that handles communication with OpenAI’s API, processing both text conversations and image generation requests.
Create a new file for your API endpoint:
mkdir -p src/app/api/chat
touch src/app/api/chat/route.ts
Open src/app/api/chat/route.ts and add the following code to handle API requests:
import { NextRequest, NextResponse } from 'next/server';
import OpenAI from 'openai';

const openai = new OpenAI({
  apiKey: process.env.OPENAI_API_KEY,
});

export async function POST(request: NextRequest) {
  try {
    const { messages, mode, model = 'gpt-4o' } = await request.json();

    // Validate input
    if (!messages || !Array.isArray(messages) || messages.length === 0) {
      return NextResponse.json(
        { error: 'Invalid messages format' },
        { status: 400 }
      );
    }

    if (mode === 'chat') {
      const completion = await openai.chat.completions.create({
        model: model,
        messages: messages,
        temperature: 0.7,
        max_tokens: 1000,
      });

      return NextResponse.json({
        content: completion.choices[0].message.content,
        role: 'assistant',
      });
    } else if (mode === 'image') {
      const lastMessage = messages[messages.length - 1];

      // Using DALL-E 3 for image generation
      // Note: As of 2025, GPT-4o with vision can analyze images but doesn't generate them
      // For image generation, we use DALL-E 3 which is the latest image generation model
      const imageResponse = await openai.images.generate({
        model: 'dall-e-3',
        prompt: lastMessage.content,
        n: 1,
        size: '1024x1024',
        quality: 'hd', // Use HD quality for better results
        style: 'vivid', // More vibrant and detailed images
      });

      return NextResponse.json({
        content: imageResponse.data[0].url,
        role: 'assistant',
        type: 'image',
      });
    }

    return NextResponse.json({ error: 'Invalid mode' }, { status: 400 });
  } catch (error) {
    console.error('API Error:', error);

    if (error instanceof OpenAI.APIError) {
      return NextResponse.json(
        { error: `OpenAI API error: ${error.message}` },
        { status: error.status || 500 }
      );
    }

    return NextResponse.json(
      { error: 'Failed to process request' },
      { status: 500 }
    );
  }
}
This API endpoint accepts POST requests with a messages array and a mode parameter. When the mode is chat, it uses GPT-4o to generate text responses. When the mode is image, it generates images using DALL-E 3. The temperature parameter controls the randomness of responses, with 0.7 providing a good balance between creativity and consistency.
You have created an API endpoint that can handle both text and image generation requests. In the next step, you will build the user interface for your AI assistant.
Step 3 — Building the Chat Interface
In this step, you will create a modern, responsive chat interface that resembles ChatGPT’s design, complete with message history and input handling.
First, create a new component for the chat interface:
mkdir -p src/components
touch src/components/ChatInterface.tsx
Open src/components/ChatInterface.tsx and add the following code:
'use client';

import { useState, useRef, useEffect } from 'react';
import ReactMarkdown from 'react-markdown';
import remarkGfm from 'remark-gfm';

interface Message {
  role: 'user' | 'assistant';
  content: string;
  type?: 'text' | 'image';
  model?: string;
}

const AVAILABLE_MODELS = [
  { id: 'gpt-4o', name: 'GPT-4o', description: 'Great for most tasks' },
  { id: 'o3', name: 'o3', description: 'Uses advanced reasoning' },
  { id: 'o4-mini', name: 'o4-mini', description: 'Fastest at advanced reasoning' },
  { id: 'o4-mini-high', name: 'o4-mini-high', description: 'Great at coding and visual reasoning' },
];

export default function ChatInterface() {
  const [messages, setMessages] = useState<Message[]>([]);
  const [input, setInput] = useState('');
  const [isLoading, setIsLoading] = useState(false);
  const [mode, setMode] = useState<'chat' | 'image'>('chat');
  const [selectedModel, setSelectedModel] = useState('gpt-4o');
  const [showModelDropdown, setShowModelDropdown] = useState(false);
  const messagesEndRef = useRef<HTMLDivElement>(null);
  const textareaRef = useRef<HTMLTextAreaElement>(null);

  const scrollToBottom = () => {
    messagesEndRef.current?.scrollIntoView({ behavior: 'smooth' });
  };

  useEffect(() => {
    scrollToBottom();
  }, [messages]);

  // Auto-resize textarea
  useEffect(() => {
    if (textareaRef.current) {
      textareaRef.current.style.height = 'auto';
      textareaRef.current.style.height = textareaRef.current.scrollHeight + 'px';
    }
  }, [input]);

  const handleSubmit = async (e: React.FormEvent) => {
    e.preventDefault();
    if (!input.trim() || isLoading) return;

    const userMessage: Message = {
      role: 'user',
      content: input,
      model: selectedModel
    };
    setMessages(prev => [...prev, userMessage]);
    setInput('');
    setIsLoading(true);

    try {
      const response = await fetch('/api/chat', {
        method: 'POST',
        headers: { 'Content-Type': 'application/json' },
        body: JSON.stringify({
          messages: [...messages, userMessage],
          mode: mode,
          model: selectedModel,
        }),
      });

      const data = await response.json();
      setMessages(prev => [...prev, { ...data, model: selectedModel }]);
    } catch (error) {
      console.error('Error:', error);
      setMessages(prev => [...prev, {
        role: 'assistant',
        content: 'Sorry, I encountered an error. Please try again.',
        model: selectedModel,
      }]);
    } finally {
      setIsLoading(false);
    }
  };

  const handleKeyDown = (e: React.KeyboardEvent<HTMLTextAreaElement>) => {
    if (e.key === 'Enter' && !e.shiftKey) {
      e.preventDefault();
      handleSubmit(e as any);
    }
  };

  const clearConversation = () => {
    setMessages([]);
  };

  return (
    <div className="flex flex-col h-screen bg-gray-50">
      {/* Header */}
      <div className="bg-white border-b border-gray-200 px-4 py-2">
        <div className="max-w-3xl mx-auto flex items-center justify-between">
          <div className="flex items-center gap-3">
            <h1 className="text-lg font-semibold">ChatGPT 4o</h1>
            <div className="relative">
              <button
                onClick={() => setShowModelDropdown(!showModelDropdown)}
                className="flex items-center gap-2 px-3 py-1.5 text-sm text-gray-600 hover:text-gray-800 transition-colors"
              >
                <span>{AVAILABLE_MODELS.find(m => m.id === selectedModel)?.name}</span>
                <svg className="w-4 h-4" fill="none" stroke="currentColor" viewBox="0 0 24 24">
                  <path strokeLinecap="round" strokeLinejoin="round" strokeWidth={2} d="M19 9l-7 7-7-7" />
                </svg>
              </button>

              {showModelDropdown && (
                <div className="absolute top-full left-0 mt-1 w-80 bg-white rounded-xl shadow-lg border border-gray-200 py-2 z-50">
                  <div className="px-4 py-2 text-sm text-gray-500">Models</div>
                  {AVAILABLE_MODELS.map(model => (
                    <button
                      key={model.id}
                      onClick={() => {
                        setSelectedModel(model.id);
                        setShowModelDropdown(false);
                      }}
                      className={`w-full text-left px-4 py-3 hover:bg-gray-50 flex items-center justify-between group ${
                        selectedModel === model.id ? 'bg-gray-50' : ''
                      }`}
                    >
                      <div>
                        <div className="font-medium text-sm">{model.name}</div>
                        <div className="text-xs text-gray-500">{model.description}</div>
                      </div>
                      {selectedModel === model.id && (
                        <svg className="w-5 h-5 text-gray-600" fill="none" stroke="currentColor" viewBox="0 0 24 24">
                          <path strokeLinecap="round" strokeLinejoin="round" strokeWidth={2} d="M5 13l4 4L19 7" />
                        </svg>
                      )}
                    </button>
                  ))}
                  <div className="border-t border-gray-200 mt-2 pt-2">
                    <button className="w-full text-left px-4 py-3 hover:bg-gray-50 flex items-center justify-between text-sm">
                      <span>More models</span>
                      <svg className="w-4 h-4" fill="none" stroke="currentColor" viewBox="0 0 24 24">
                        <path strokeLinecap="round" strokeLinejoin="round" strokeWidth={2} d="M9 5l7 7-7 7" />
                      </svg>
                    </button>
                  </div>
                </div>
              )}
            </div>
          </div>

          <button
            onClick={clearConversation}
            className="p-2 text-gray-600 hover:text-gray-800 transition-colors"
          >
            <svg className="w-5 h-5" fill="none" stroke="currentColor" viewBox="0 0 24 24">
              <path strokeLinecap="round" strokeLinejoin="round" strokeWidth={2} d="M12 4v16m8-8H4" />
            </svg>
          </button>
        </div>
      </div>

      {/* Messages */}
      <div className="flex-1 overflow-y-auto">
        <div className="max-w-3xl mx-auto">
          {messages.length === 0 && (
            <div className="text-center py-24">
              <h2 className="text-3xl font-semibold text-gray-900 mb-2">How can I help you today?</h2>
            </div>
          )}

          {messages.map((message, index) => (
            <div
              key={index}
              className={`group ${
                message.role === 'user' ? '' : ''
              } px-4 py-6`}
            >
              <div className="max-w-3xl mx-auto flex gap-4">
                <div className={`w-8 h-8 rounded-full flex items-center justify-center flex-shrink-0 ${
                  message.role === 'user'
                    ? 'bg-white border border-gray-300'
                    : 'bg-black text-white'
                }`}>
                  {message.role === 'user' ? (
                    <svg className="w-5 h-5 text-gray-600" fill="none" stroke="currentColor" viewBox="0 0 24 24">
                      <path strokeLinecap="round" strokeLinejoin="round" strokeWidth={2} d="M16 7a4 4 0 11-8 0 4 4 0 018 0zM12 14a7 7 0 00-7 7h14a7 7 0 00-7-7z" />
                    </svg>
                  ) : (
                    <svg className="w-5 h-5" fill="currentColor" viewBox="0 0 24 24">
                      <path d="M12 2L2 7v10c0 5.55 3.84 10.74 9 12 5.16-1.26 9-6.45 9-12V7l-10-5z"/>
                    </svg>
                  )}
                </div>

                <div className="flex-1 overflow-hidden">
                  <div className="font-semibold text-sm mb-1">
                    {message.role === 'user' ? 'You' : 'ChatGPT'}
                  </div>
                  {message.type === 'image' ? (
                    <img
                      src={message.content}
                      alt="Generated image"
                      className="max-w-full rounded-lg shadow-sm"
                    />
                  ) : (
                    <div className="prose prose-sm max-w-none text-gray-800">
                      <ReactMarkdown remarkPlugins={[remarkGfm]}>
                        {message.content}
                      </ReactMarkdown>
                    </div>
                  )}
                </div>
              </div>
            </div>
          ))}

          {isLoading && (
            <div className="px-4 py-6">
              <div className="max-w-3xl mx-auto flex gap-4">
                <div className="w-8 h-8 rounded-full bg-black flex items-center justify-center flex-shrink-0">
                  <div className="flex space-x-1">
                    <div className="w-1.5 h-1.5 bg-white rounded-full animate-pulse" />
                    <div className="w-1.5 h-1.5 bg-white rounded-full animate-pulse" style={{ animationDelay: '0.2s' }} />
                    <div className="w-1.5 h-1.5 bg-white rounded-full animate-pulse" style={{ animationDelay: '0.4s' }} />
                  </div>
                </div>
                <div className="flex-1">
                  <div className="font-semibold text-sm mb-1">ChatGPT</div>
                  <div className="text-gray-600 text-sm">Thinking...</div>
                </div>
              </div>
            </div>
          )}

          <div ref={messagesEndRef} />
        </div>
      </div>

      {/* Input Area */}
      <div className="border-t bg-white">
        <div className="max-w-3xl mx-auto p-4">
          <div className="flex gap-2 mb-3">
            <button
              onClick={() => setMode('chat')}
              className={`flex items-center gap-2 px-4 py-2 rounded-lg text-sm font-medium transition-all ${
                mode === 'chat'
                  ? 'bg-black text-white'
                  : 'bg-gray-100 text-gray-700 hover:bg-gray-200'
              }`}
            >
              <svg className="w-4 h-4" fill="none" stroke="currentColor" viewBox="0 0 24 24">
                <path strokeLinecap="round" strokeLinejoin="round" strokeWidth={2} d="M8 10h.01M12 10h.01M16 10h.01M9 16H5a2 2 0 01-2-2V6a2 2 0 012-2h14a2 2 0 012 2v8a2 2 0 01-2 2h-5l-5 5v-5z" />
              </svg>
              Chat
            </button>
            <button
              onClick={() => setMode('image')}
              className={`flex items-center gap-2 px-4 py-2 rounded-lg text-sm font-medium transition-all ${
                mode === 'image'
                  ? 'bg-black text-white'
                  : 'bg-gray-100 text-gray-700 hover:bg-gray-200'
              }`}
            >
              <svg className="w-4 h-4" fill="none" stroke="currentColor" viewBox="0 0 24 24">
                <path strokeLinecap="round" strokeLinejoin="round" strokeWidth={2} d="M4 16l4.586-4.586a2 2 0 012.828 0L16 16m-2-2l1.586-1.586a2 2 0 012.828 0L20 14m-6-6h.01M6 20h12a2 2 0 002-2V6a2 2 0 00-2-2H6a2 2 0 00-2 2v12a2 2 0 002 2z" />
              </svg>
              Generate Image
            </button>
          </div>

          <form onSubmit={handleSubmit} className="relative">
            <textarea
              ref={textareaRef}
              value={input}
              onChange={(e) => setInput(e.target.value)}
              onKeyDown={handleKeyDown}
              placeholder={
                mode === 'chat'
                  ? 'Message ChatGPT...'
                  : 'Describe the image you want to generate...'
              }
              className="w-full px-4 py-3 pr-12 bg-gray-100 border border-gray-200 rounded-2xl resize-none focus:outline-none focus:ring-2 focus:ring-black focus:border-transparent"
              rows={1}
              style={{ maxHeight: '200px' }}
              disabled={isLoading}
            />
            <button
              type="submit"
              disabled={isLoading || !input.trim()}
              className={`absolute right-3 bottom-3 p-1.5 rounded-lg transition-all ${
                isLoading || !input.trim()
                  ? 'text-gray-300 cursor-not-allowed'
                  : 'text-white bg-black hover:bg-gray-800'
              }`}
            >
              <svg className="w-5 h-5" fill="none" stroke="currentColor" viewBox="0 0 24 24">
                <path strokeLinecap="round" strokeLinejoin="round" strokeWidth={2} d="M5 10l7-7m0 0l7 7m-7-7v18" />
              </svg>
            </button>
          </form>

          <p className="text-xs text-gray-500 mt-2 text-center">
            {mode === 'chat'
              ? 'ChatGPT can make mistakes. Check important info.'
              : 'AI-generated images may vary from your description.'}
          </p>
        </div>
      </div>
    </div>
  );
}
This component creates a full-screen chat interface with message history, mode switching between chat and image generation, and a loading indicator. The interface uses Tailwind CSS for styling and includes smooth scrolling to keep the latest messages in view.
You have built a responsive chat interface for your AI assistant. In the next step, you will integrate this component into your application.
Step 4 — Integrating the Chat Interface
In this step, you will integrate the chat interface into your Next.js application and add finishing touches to create a polished user experience.
Open src/app/page.tsx and replace its contents with:
import ChatInterface from '@/components/ChatInterface';

export default function Home() {
  return (
    <main className="h-screen">
      <ChatInterface />
    </main>
  );
}
Next, update the layout file to include a header. Open src/app/layout.tsx and modify it:
import type { Metadata } from 'next';
import { Inter } from 'next/font/google';
import './globals.css';

const inter = Inter({ subsets: ['latin'] });

export const metadata: Metadata = {
  title: 'AI Assistant - Powered by GPT-4o',
  description: 'A multimodal AI assistant built with JavaScript',
};

export default function RootLayout({
  children,
}: {
  children: React.ReactNode;
}) {
  return (
    <html lang="en">
      <body className={inter.className}>
        <header className="bg-white border-b border-gray-200 px-4 py-3">
          <div className="max-w-7xl mx-auto flex items-center justify-between">
            <h1 className="text-xl font-semibold text-gray-800">
              AI Assistant
            </h1>
            <span className="text-sm text-gray-500">
              Powered by GPT-4o
            </span>
          </div>
        </header>
        {children}
      </body>
    </html>
  );
}
Now, create a custom error boundary to handle any runtime errors gracefully. Create a new file called:
touch src/app/error.tsx
Add the following error handling code:
'use client';

export default function Error({
  error,
  reset,
}: {
  error: Error & { digest?: string };
  reset: () => void;
}) {
  return (
    <div className="flex h-screen items-center justify-center">
      <div className="text-center">
        <h2 className="text-2xl font-semibold text-gray-800 mb-4">
          Something went wrong!
        </h2>
        <p className="text-gray-600 mb-4">{error.message}</p>
        <button
          onClick={reset}
          className="px-4 py-2 bg-blue-500 text-white rounded hover:bg-blue-600"
        >
          Try again
        </button>
      </div>
    </div>
  );
}
Step 5 — Testing Your AI Assistant
In this step, you will test your AI assistant to ensure it is working correctly.
Start the development server:
npm run dev
Navigate to http://localhost:3000 in your browser. You should see your AI assistant interface with options to switch between chat and image generation modes.

In the next step, you will deploy your Javascript AI assistant to DigitalOcean App Platform using DigitalOcean MCP Server.
Step 6 — Deploying to DigitalOcean App Platform using DigitalOcean MCP Server
To deploy your JavaScript AI assistant to the DigitalOcean App Platform, you’ll need to set up a DigitalOcean MCP Server. This process involves generating a DigitalOcean API token and configuring your AI assistant to use it.
Step 1: Generate a DigitalOcean API Token
First, you need to generate a Personal Access Token from your DigitalOcean account. This token will be used to authenticate your AI assistant with the DigitalOcean App Platform. To do this:
- Log in to your DigitalOcean account and navigate to the API Settings.
- Click on the Generate New Token button.
- Select App Platform as the scope for the token.
- Give the token a name (e.g., “AI Assistant Token”) and click Generate Token.

Step 2: Configure Your AI Assistant with the API Token
Next, you’ll need to configure your AI assistant to use the generated API token. This involves setting up a DigitalOcean MCP Server using Cursor.
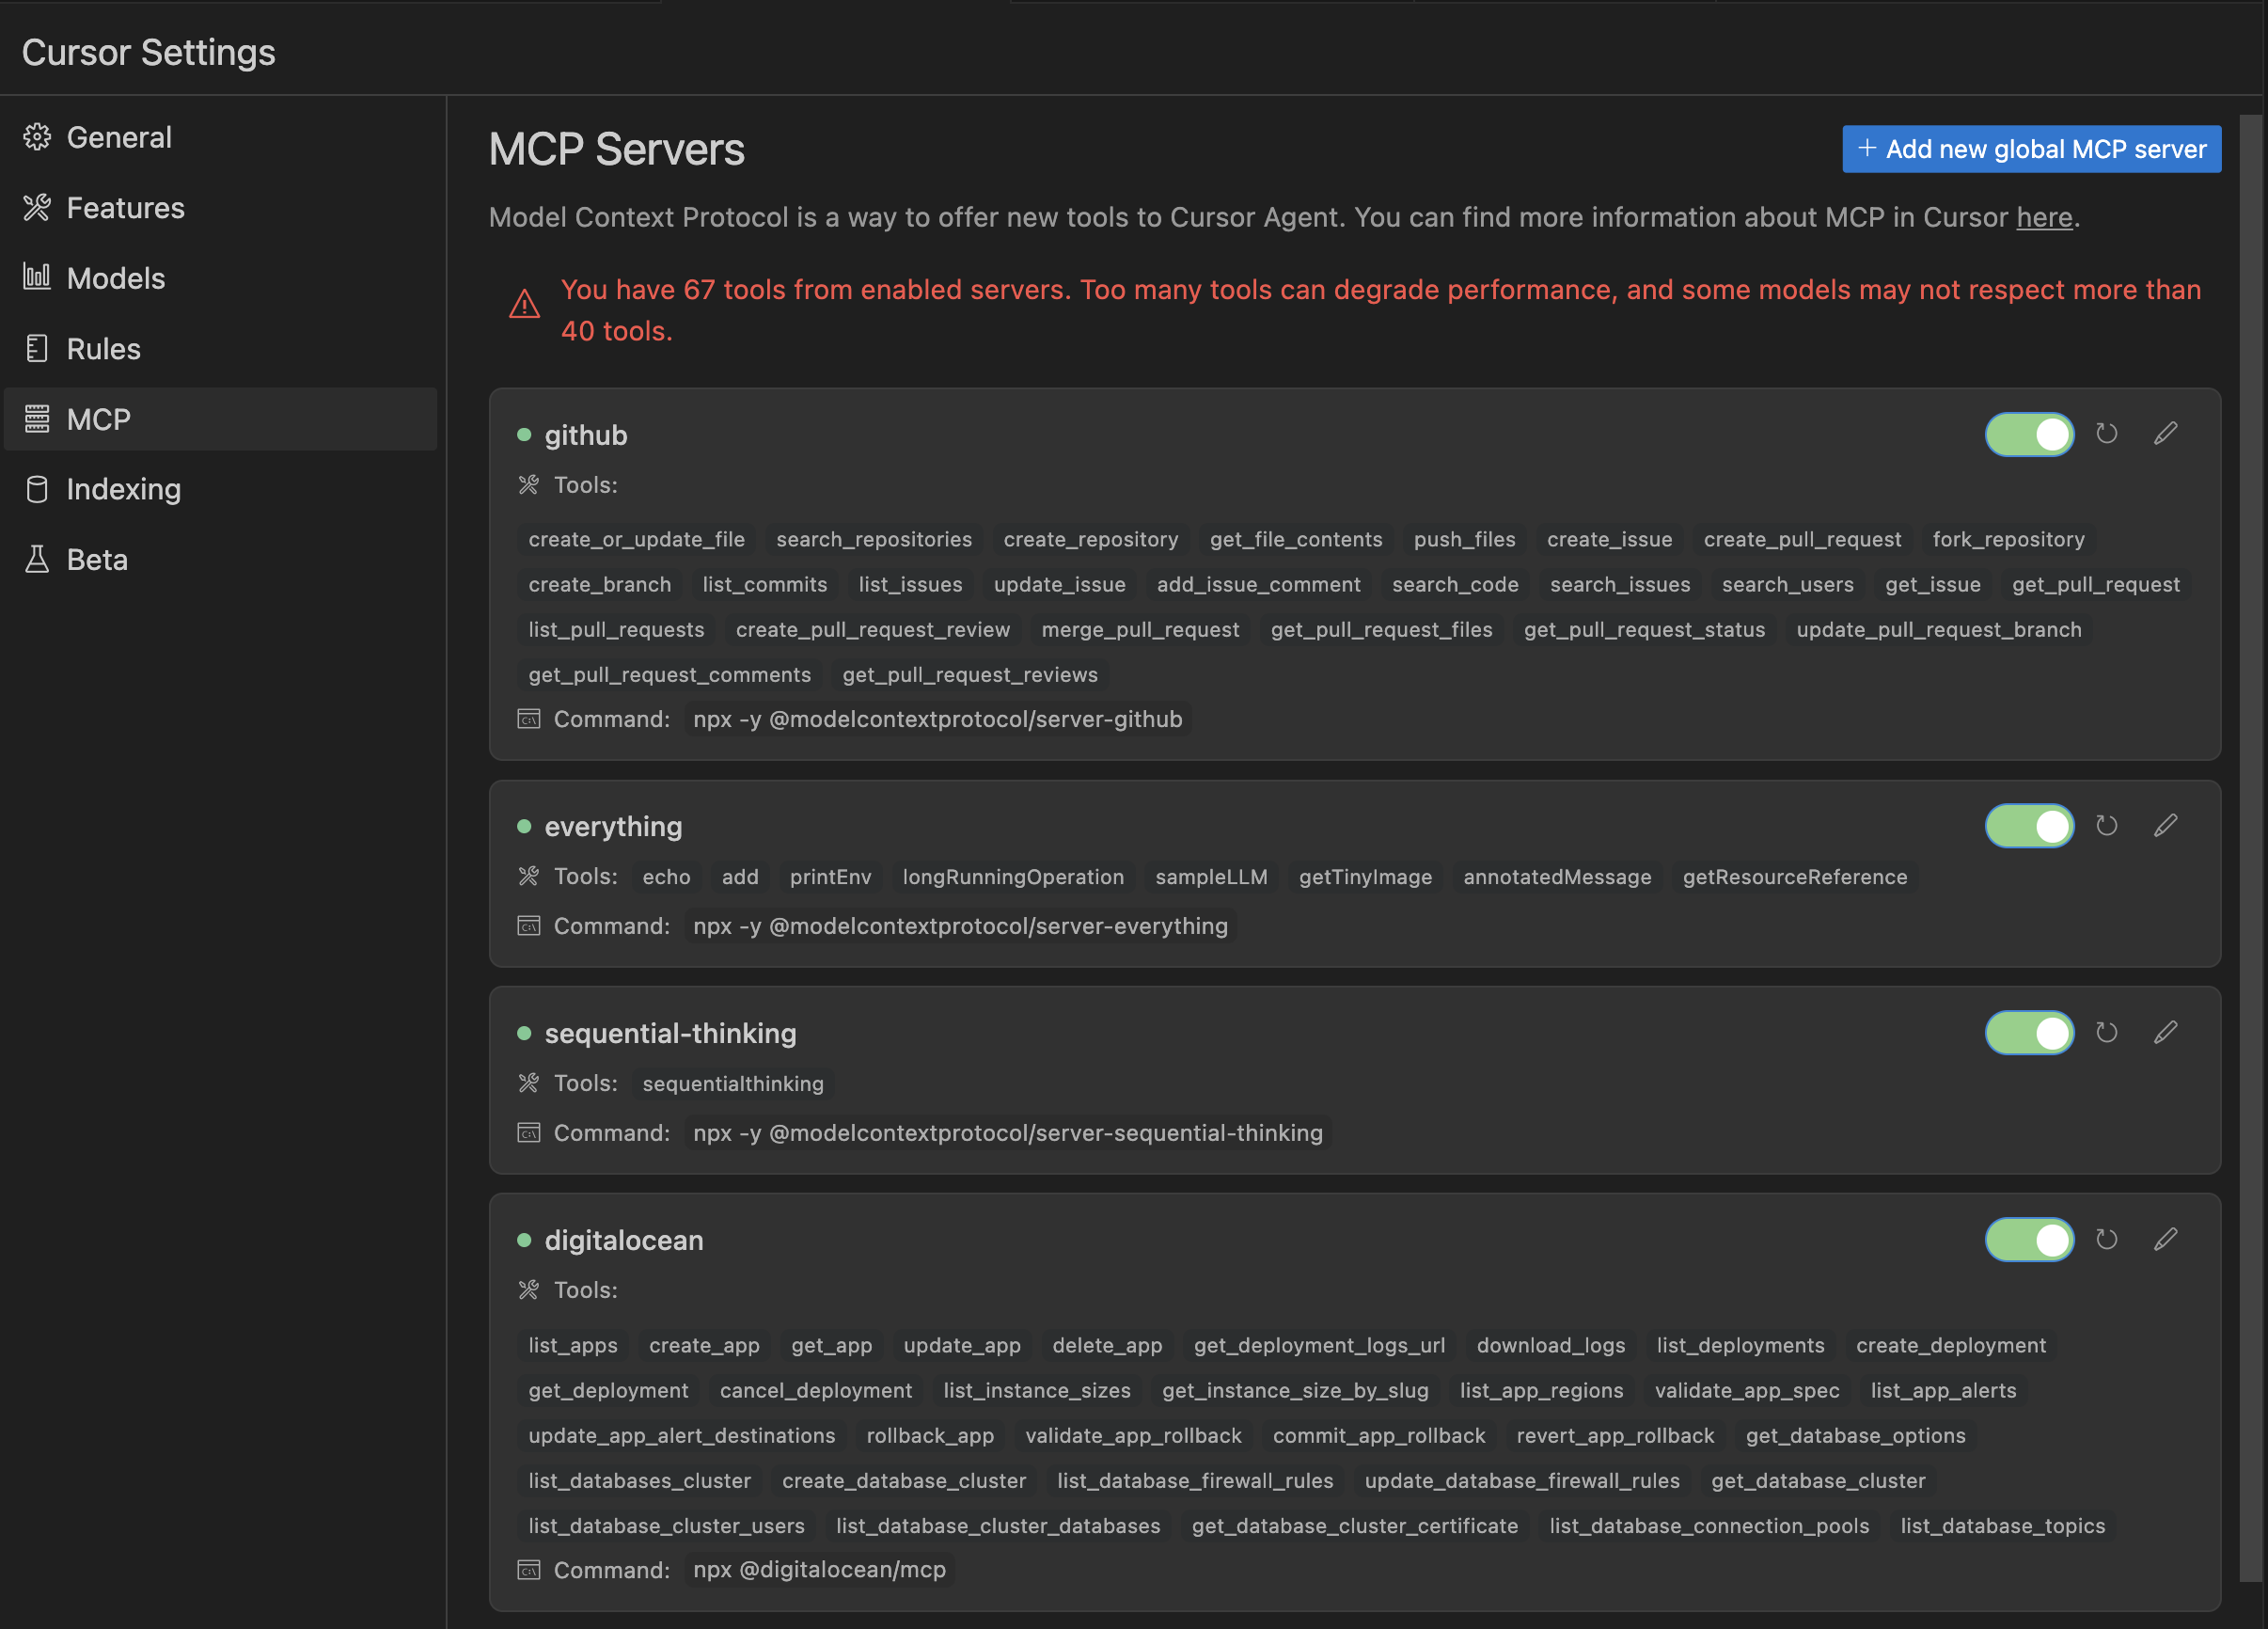
Setting Up Cursor
- Open your Cursor settings and navigate to MCP.
- Click on “Add a new global MCP server”.
- In the configuration file
~/.cursor/mcp.json, add the following JSON block:
{
  "mcpServers": {
    "github": {
      "command": "npx",
      "args": [
        "-y",
        "@modelcontextprotocol/server-github"
      ],
      "env": {
        "GITHUB_PERSONAL_ACCESS_TOKEN": "YOUR_GITHUB_PERSONAL_ACCESS_TOKEN"
      }
    },
    "everything": {
      "command": "npx",
      "args": ["-y", "@modelcontextprotocol/server-everything"]
    },
    "sequential-thinking": {
      "command": "npx",
      "args": [
        "-y",
        "@modelcontextprotocol/server-sequential-thinking"
      ]
    },
    "digitalocean": {
      "command": "npx",
      "args": ["@digitalocean/mcp"],
      "env": {
        "DIGITALOCEAN_API_TOKEN": "YOUR_DO_TOKEN"
      }
    }
  }
}
The following JSON block configures the MCP (Model Context Protocol) servers for the Cursor tool.
- The “github” server is set up to use the Github MCP Server to use the
@modelcontextprotocol/server-githubpackage with a GitHub personal access token. - The “everything” server uses the Everything MCP Server to use the
@modelcontextprotocol/server-everythingpackage. - The “sequential-thinking” server uses the Sequential Thinking MCP Server to use the
@modelcontextprotocol/server-sequential-thinkingpackage. - The “digitalocean” server uses the DigitalOcean MCP Server to use the
@digitalocean/mcppackage with a DigitalOcean API token.
Testing Your MCP Server
Once you’ve set up your DigitalOcean MCP Server, you can test it by running a few commands in Cursor. Try the following prompts to verify that your server is working correctly:
List all active apps on my account
Create a new flask app with 2GB RAM from this GitHub repo - https://github.com/do-community/do-one-click-deploy-flask
Remove the old staging-env app
Deploying Your AI Assistant
With your DigitalOcean MCP Server configured and tested, you can now deploy your JavaScript AI assistant to the DigitalOcean App Platform. To do this, use the following prompt in Cursor:
Deploy this Javascript AI assistant to DigitalOcean App Platform

Follow the steps to deploy your AI assistant to the DigitalOcean App Platform using these MCP servers.
In a gist it will create a new Github Repository and deploy it to the DigitalOcean App Platform.

You can ask questions like:

Here is your JavaScript AI assistant running on the DigitalOcean App Platform:

FAQs
1. Can I build a fully functional AI assistant using JavaScript?
Yes, it is possible to build a fully functional AI assistant using JavaScript. With the advancements in JavaScript libraries and frameworks, you can leverage tools like OpenAI, Dialogflow, or Botpress to create a conversational AI assistant that can understand and respond to user inputs. JavaScript’s versatility and the availability of these libraries make it an ideal choice for building AI assistants.
2. What’s the best JavaScript library for training an AI chatbot?
The best JavaScript library for training an AI chatbot depends on the specific requirements and goals of your project. Some popular options include:
- OpenAI: Provides a wide range of AI models for text generation, image creation, and more. It’s ideal for building conversational AI assistants with advanced language capabilities.
- Dialogflow: A Google-developed platform for building conversational interfaces. It offers a JavaScript client library for integrating with your chatbot.
- Botpress: An open-source framework for building conversational AI assistants. It provides a JavaScript SDK for creating chatbots with advanced features like natural language processing (NLP) and machine learning (ML) integration.
3. Do I need to use machine learning to train a chatbot in JavaScript?
While machine learning (ML) can significantly enhance the capabilities of your chatbot, it’s not strictly necessary to use ML to train a chatbot in JavaScript. You can create a simple chatbot using rule-based systems or decision trees without ML. However, if you want to build a more advanced chatbot that can learn from user interactions and improve over time, incorporating ML techniques like NLP and deep learning can be beneficial.
4. Is Python or JavaScript better for AI?
Both Python and JavaScript are suitable for AI development, and the choice ultimately depends on your project’s specific requirements and your personal preferences. Python is often preferred for AI and ML tasks due to its extensive libraries like TensorFlow, Keras, and scikit-learn, which make it easier to implement complex AI models. JavaScript, on the other hand, is ideal for client-side AI applications, such as chatbots, and can be used for server-side AI tasks with the help of Node.js and libraries like TensorFlow.js.
Conclusion and Next Steps
In this tutorial, you have successfully built and deployed a multimodal AI assistant using JavaScript, capable of processing text and generating images. You have explored the integration of OpenAI’s APIs with Next.js and React, creating a modern, ChatGPT-like interface for handling conversations and image generation. You have also deployed your AI assistant to the DigitalOcean App Platform using the DigitalOcean MCP Server.
To further enhance your AI assistant or explore other AI-related projects, we recommend checking out the following tutorials and resources:
- AI Personal Coding Assistant Tutorial: Learn how to build a personal coding assistant that can assist with code completion and debugging.
- 1-Click Model Personal Assistant: Discover how to create a personal assistant that can be deployed with a single click, leveraging the power of AI models.
- Build AI Agent Chatbot with GenAI Platform: Explore the process of building an AI agent chatbot using the GenAI platform, enabling advanced conversational capabilities.
- Best AI Coding Assistant: Read about the best AI coding assistants available, their features, and how they can improve your coding experience.
- Control Apps Using MCP Server: Learn how to use the Model Context Protocol (MCP) server to control and manage your applications, including AI assistants.
Thanks for learning with the DigitalOcean Community. Check out our offerings for compute, storage, networking, and managed databases.
About the author
I help Businesses scale with AI x SEO x (authentic) Content that revives traffic and keeps leads flowing | 3,000,000+ Average monthly readers on Medium | Sr Technical Writer @ DigitalOcean | Ex-Cloud Consultant @ AMEX | Ex-Site Reliability Engineer(DevOps)@Nutanix
Still looking for an answer?
This textbox defaults to using Markdown to format your answer.
You can type !ref in this text area to quickly search our full set of tutorials, documentation & marketplace offerings and insert the link!
This is a wonderful tutorial. Thank you.
Do you have a repo for your code, including:
src/components/ChatInterface.tsx
 This work is licensed under a Creative Commons Attribution-NonCommercial- ShareAlike 4.0 International License.
Become a contributor for community
Get paid to write technical tutorials and select a tech-focused charity to receive a matching donation.

DigitalOcean Documentation
Full documentation for every DigitalOcean product.

Resources for startups and SMBs
The Wave has everything you need to know about building a business, from raising funding to marketing your product.
The developer cloud
Scale up as you grow — whether you're running one virtual machine or ten thousand.

Get started for free
Sign up and get $200 in credit for your first 60 days with DigitalOcean.*

*This promotional offer applies to new accounts only.